DIY Guide: How to Repair Drywall Cracks Like a Pro
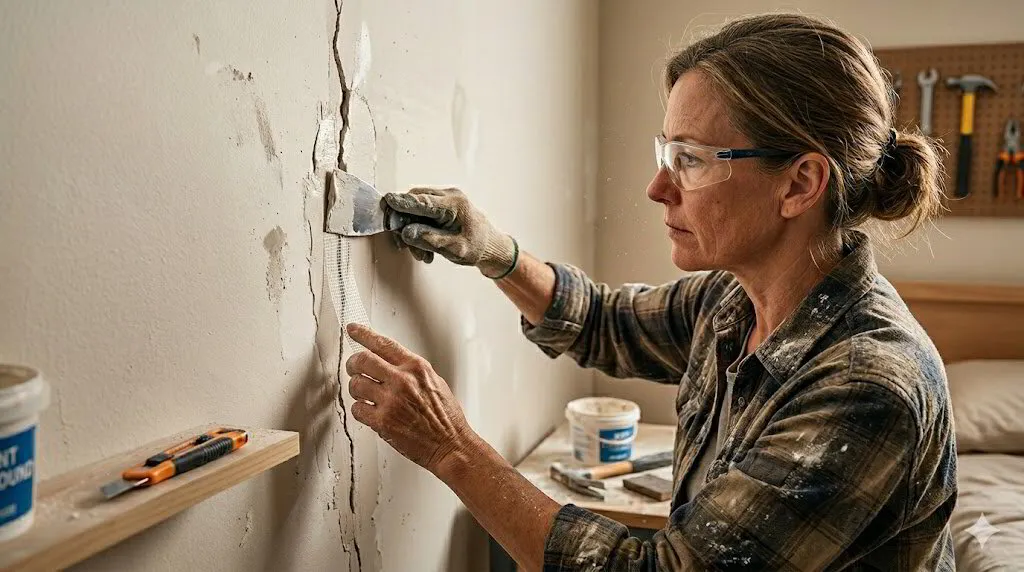
Drywall cracks are an inevitable part of homeownership that can transform pristine walls into unsightly reminders of settling foundations, temperature fluctuations, and daily wear. Whether you're managing rental properties in Detroit's historic neighborhoods or maintaining your family home in the surrounding counties, understanding how to repair drywall cracks effectively can save significant time and money while preserving your property's aesthetic appeal.
These seemingly minor imperfections often signal underlying issues that, when addressed promptly, prevent costly structural problems down the road. From hairline fractures caused by seasonal humidity changes to more pronounced cracks resulting from foundation settlement, each type requires specific attention and repair techniques. The good news is that most drywall crack repairs fall within the capabilities of motivated DIY enthusiasts who possess basic tools and follow proper procedures.
This comprehensive guide will walk you through professional-grade drywall repair techniques, helping you achieve seamless results that blend perfectly with existing finishes. You'll learn to identify different crack types, select appropriate materials, and execute repairs with confidence. While some situations warrant professional intervention, mastering these fundamental skills empowers property owners to maintain their investments proactively and address minor issues before they escalate into major renovation projects.
Introduction to Drywall Cracks
Drywall cracks develop through various mechanisms that affect properties throughout Southeastern Michigan's diverse housing stock. Temperature fluctuations between harsh winters and humid summers cause building materials to expand and contract, creating stress points where drywall panels meet. Foundation settling, particularly common in older Detroit-area homes, generates movement that translates into visible wall damage. Additionally, moisture infiltration from plumbing leaks, HVAC condensation, or inadequate ventilation weakens drywall compound, making it susceptible to cracking.
The significance of timely drywall crack repair extends beyond aesthetic concerns. Small cracks provide entry points for moisture, potentially leading to mold growth and structural deterioration. In rental properties, visible wall damage creates negative impressions on prospective tenants and may indicate maintenance neglect. Commercial property owners understand that professional appearances directly impact customer perceptions and business success. For more insights on this topic, read our article on preventive strategies against drywall cracks.
DIY drywall repair offers numerous advantages for property owners willing to invest time in learning proper techniques. Cost savings represent the most immediate benefit, as professional repair services can charge premium rates for relatively simple fixes. Additionally, developing these skills provides flexibility to address issues on your timeline rather than waiting for contractor availability. The satisfaction of completing quality repairs builds confidence for tackling future maintenance challenges. Most importantly, understanding drywall repair techniques helps property owners communicate effectively with professionals when complex issues arise, ensuring appropriate solutions and fair pricing for necessary work.
Types of Drywall Cracks
Understanding different crack types enables property owners to select appropriate repair strategies and identify potential underlying issues requiring professional attention. Each crack category exhibits distinct characteristics that inform both repair approaches and preventive measures.
Hairline Cracks
Hairline cracks appear as thin, superficial lines typically measuring less than 1/16 inch in width. These minor imperfections commonly develop at drywall seams where panels meet, particularly along ceiling edges and wall intersections. Paint-only cracks often result from multiple paint layers building up over time, creating brittle surfaces that crack under minimal stress. Temperature and humidity fluctuations cause these cracks to open and close seasonally, making them persistent maintenance issues in Michigan's variable climate.
Shrinkage Cracks
Shrinkage cracks occur when drywall compound or joint tape contracts during the curing process. These linear cracks typically follow seam lines and may appear weeks or months after initial installation. Poor-quality materials, improper mixing ratios, or inadequate drying time contribute to shrinkage crack development. High humidity levels during construction or rapid temperature changes can exacerbate shrinkage issues, making proper environmental control essential during drywall installation and repair projects.
Settlement Cracks
Settlement cracks indicate building movement caused by foundation shifting, soil conditions, or structural changes. These cracks often appear as diagonal lines extending from door and window corners, following stress concentration points in the wall system. Settlement cracks may vary in width and can reopen after repair if underlying movement continues. Properties built on clay soils, common throughout the Detroit metropolitan area, are particularly susceptible to settlement-related cracking due to soil expansion and contraction cycles.
Structural Cracks
Structural cracks represent the most serious category, indicating significant building movement or load-bearing issues. These cracks typically exceed 1/4 inch in width and may be accompanied by doors that stick, windows that won't close properly, or visible wall bowing. Structural cracks often reappear quickly after repair attempts and may worsen over time. Water damage, foundation problems, or inadequate framing can contribute to structural crack development. These issues require immediate professional evaluation to determine appropriate remediation strategies and ensure occupant safety.
Tools and Materials Needed for Repair
Successful drywall crack repair depends on having appropriate tools and materials readily available before beginning work. Professional-quality supplies ensure durable repairs that blend seamlessly with existing finishes.
Essential Tools for Drywall Repair
A comprehensive tool kit should include putty knives in various sizes, ranging from 3-inch blades for narrow cracks to 8-inch or 10-inch knives for broader applications. Flexible blade materials allow better control and smoother compound application. Sandpaper in multiple grits, including 120-grit for initial shaping and 220-grit for final smoothing, ensures proper surface preparation. Sanding blocks or electric sanders speed the process while maintaining consistent pressure across repair areas.
Additional essential tools include utility knives with sharp blades for cutting away loose material, wire brushes for cleaning debris from cracks, and drop cloths to protect surrounding surfaces. Measuring tools, including rulers and pencils, help mark repair areas accurately. A sturdy step ladder provides safe access to ceiling cracks and high wall areas. Good lighting, whether from work lamps or flashlights, reveals surface imperfections that might be missed under normal room lighting conditions.
Drywall Patching Materials
Joint compound, available in ready-mixed or powder forms, serves as the primary patching material for most crack repairs. Ready-mixed compounds offer convenience but may shrink more than powder varieties. Mesh tape or paper tape reinforces larger cracks and prevents future reopening. Self-adhesive mesh tape simplifies application but paper tape provides superior strength for critical repairs.
For larger damage, drywall patches or backing materials may be necessary. Primer specifically designed for drywall ensures proper paint adhesion over repaired areas. Quality materials may cost slightly more initially but provide superior long-term performance and reduce the likelihood of repair failures.
Painting Supplies
Matching existing paint requires careful color selection and appropriate brush or roller types. Small artist brushes work well for touch-up applications, while mini rollers provide better texture matching on textured surfaces. Paint trays, mixing sticks, and clean rags complete the painting supply list. Water-based primers dry quickly and provide excellent adhesion for most residential applications.
Step-by-Step Guide to Repairing Drywall Cracks
Professional-quality drywall crack repair follows a systematic approach that ensures durable, invisible results. Each step builds upon the previous work, creating a foundation for long-lasting repairs.
Preparation of the Area
Begin by thoroughly cleaning the crack and surrounding area to remove loose debris, dust, and any flaking paint or compound. Use a wire brush or utility knife to gently scrape away unstable material, creating clean edges that will accept new compound properly. Vacuum or wipe away all debris to ensure optimal adhesion.
Protect surrounding surfaces with drop cloths or plastic sheeting, paying particular attention to flooring and furniture that cannot be moved. Remove outlet covers and switch plates near the repair area to prevent accidental damage and ensure clean edges around electrical fixtures.
Examine the crack carefully to determine its full extent. Sometimes surface cracks extend beyond what's immediately visible, requiring more extensive repair than initially apparent. Use a flashlight or work lamp to illuminate the area from different angles, revealing subtle damage that might be missed under normal lighting conditions.
Test the stability of surrounding drywall by pressing gently around the crack perimeter. Soft or spongy areas may indicate water damage or deteriorated compound that requires additional attention. Mark the full extent of damage with light pencil marks to guide your repair efforts.
Choosing the Right Patching Technique
Crack width and depth determine the most appropriate repair approach. Hairline cracks often require only joint compound application, while wider cracks benefit from reinforcement with mesh or paper tape. Very wide cracks may need backing material or even partial drywall replacement.
For cracks less than 1/8 inch wide, apply joint compound directly into the crack using a putty knife, working the material deep into the opening. Slightly overfill the crack to account for compound shrinkage during drying. For wider cracks, apply self-adhesive mesh tape over the crack before adding compound, ensuring the tape extends at least one inch beyond each end of the crack.
Settlement cracks that may reopen require flexible repair approaches. Consider using elastomeric compounds or caulk that can accommodate minor movement without cracking. However, remember that these materials may not accept paint as well as standard joint compounds.
Application of Patching Material
Apply joint compound in thin, even coats using smooth, consistent strokes. Hold the putty knife at a slight angle to the wall surface, maintaining steady pressure throughout each pass. Work from one end of the crack to the other in continuous motions when possible, avoiding stopping and starting within the repair area.
For reinforced repairs using tape, apply a base coat of compound, embed the tape while the compound is still wet, then apply additional coats as needed. Remove excess compound that squeezes through mesh tape openings, as these raised areas will show through the final finish.
Allow each coat to dry completely before applying subsequent layers. Rushing this process often leads to compound cracking or poor adhesion between coats. Drying times vary with humidity, temperature, and compound thickness, but typically range from 4 to 24 hours.
Build up the repair gradually with multiple thin coats rather than attempting to fill deep cracks in a single application. This approach minimizes shrinkage cracking and provides better long-term durability. Each coat should extend slightly beyond the previous application, feathering the edges to blend with the surrounding wall surface.
Sanding and Smoothing the Repair
Once the final compound coat has dried completely, begin sanding with medium-grit sandpaper to remove high spots and blend the repair with surrounding surfaces. Use circular motions initially, then switch to straight strokes that follow the wall's natural texture pattern.
Progress to finer grits for final smoothing, taking care not to sand through the compound into the underlying crack. Dust frequently with a clean cloth or vacuum to monitor progress and prevent compound dust from clogging sandpaper.
Pay special attention to feathered edges where the repair meets existing wall surfaces. These transition areas should be virtually invisible when properly blended. Use a straightedge or your hand to check for smoothness, as visual inspection alone may miss subtle irregularities.
Finishing Touches (Priming and Painting)
Prime all repaired areas with high-quality drywall primer before painting. Unprimed compound will absorb paint differently than surrounding surfaces, creating visible patches even when using matching paint colors. Apply primer with a brush or small roller, extending coverage slightly beyond the repair area.
Once primer has dried completely, apply paint in thin, even coats. Use the same application method (brush, roller, or spray) that was used for the original wall finish to ensure consistent texture. For textured walls, you may need to recreate the texture pattern using specialized techniques or tools before final painting.
Apply paint in good lighting conditions to identify any areas requiring additional attention. Sometimes repairs that looked perfect under work lights show imperfections under normal room lighting. Make necessary touch-ups before considering the project complete.
When to Call a Professional
While many drywall crack repairs fall within DIY capabilities, certain situations require professional expertise to ensure proper resolution and prevent recurring problems. Recognizing these scenarios protects your investment and ensures occupant safety.
Signs of Significant Damage
Cracks exceeding 1/4 inch in width often indicate structural issues beyond simple drywall failure. Similarly, cracks that reappear shortly after repair suggest ongoing movement that DIY methods cannot address effectively. Multiple cracks appearing simultaneously across different wall areas may signal foundation settling or structural problems requiring engineering evaluation.
Water stains around cracks indicate moisture infiltration that could lead to mold growth or structural deterioration. These situations require identifying and addressing the moisture source before permanent repairs can be completed. Attempting cosmetic repairs without resolving underlying moisture issues typically results in recurring damage and potentially hazardous conditions.
Cracks accompanied by other symptoms such as sticking doors, uneven floors, or exterior foundation cracks suggest serious structural issues. These problems require immediate professional attention to prevent further damage and ensure building safety.
Potential Underlying Issues
Foundation settlement, inadequate structural support, or building code violations may contribute to recurring crack problems. Professional contractors possess the experience and diagnostic tools necessary to identify these underlying issues and recommend appropriate solutions. Attempting DIY repairs on structurally compromised walls may mask important warning signs while allowing damage to progress.
Electrical or plumbing systems concealed within walls require special consideration during repair work. Professional contractors understand building codes and safety requirements for working around these systems, reducing the risk of accidental damage or code violations.
Benefits of Professional Repairs
Professional drywall contractors bring specialized tools, materials, and techniques that ensure superior long-term results. Their experience with different crack types—and restoring surfaces like older plaster walls—enables accurate problem diagnosis and appropriate repair selection. Additionally, professional work often includes warranties that provide peace of mind and protection against repair failures.
For property owners managing multiple rental units or commercial properties, professional services offer efficiency and consistency that justify the additional cost. Contractors can often complete repairs more quickly than DIY approaches, minimizing tenant disruption and property downtime.
Maintenance Tips to Prevent Future Cracks
Proactive maintenance significantly reduces the likelihood of drywall crack development while preserving property value and minimizing repair costs over time. Regular attention to environmental factors and building systems prevents many common crack causes.
Regular Inspections
Schedule quarterly visual inspections of all interior walls and ceilings, paying particular attention to areas prone to stress such as door and window frames, corners, and ceiling edges. Document any new cracks with photographs and measurements to track progression over time. Early detection allows for simple repairs before minor issues develop into major problems.
During inspections, look for related issues such as nail pops, loose tape edges, or paint failures that may indicate developing problems. Address these minor issues promptly to prevent escalation into more serious damage requiring extensive repairs.
Humidity Control
Maintain consistent indoor humidity levels between 30% and 50% year-round to minimize expansion and contraction cycles that stress drywall systems. Use humidifiers during dry winter months and dehumidifiers during humid summer periods as needed. Monitor humidity levels with digital hygrometers placed in different areas of the building.
Address moisture sources such as plumbing leaks, HVAC condensation, or inadequate vapor barriers promptly to prevent drywall deterioration. Ensure bathroom and kitchen exhaust fans operate properly and are used consistently to remove excess moisture from these high-humidity areas.
Proper Ventilation
Maintain adequate air circulation throughout the building to prevent moisture accumulation and temperature extremes that contribute to crack development. Ensure HVAC systems are properly balanced and regularly serviced to maintain consistent environmental conditions. Replace air filters regularly to maintain optimal system performance and air quality.
Consider upgrading insulation and weatherization to reduce temperature fluctuations that stress building materials. Proper insulation also improves energy efficiency while creating more stable indoor conditions that reduce maintenance requirements.
Conclusion
Mastering how to repair drywall cracks empowers property owners to maintain their investments proactively while developing valuable hands-on skills. This comprehensive guide has covered essential techniques from crack identification through professional-quality repair execution, providing the knowledge foundation necessary for successful DIY projects.
Understanding different crack types enables appropriate repair selection while recognizing when professional intervention is necessary protects against costly mistakes. The systematic approach outlined here ensures durable repairs that blend seamlessly with existing finishes, maintaining property aesthetics and value.
Remember that prevention through proper maintenance, humidity control, and regular inspections significantly reduces repair frequency while preserving building integrity. However, when repairs exceed your comfort level or involve potential structural issues, professional expertise provides the specialized knowledge and tools necessary for proper resolution.
Take confidence in tackling straightforward crack repairs while maintaining realistic expectations about project complexity and time requirements. Quality repairs require patience and attention to detail, but the satisfaction of completing professional-grade work makes the effort worthwhile.
Ready to tackle your drywall repair project or need professional assistance? The Patch Guyz specializes in seamless drywall and ceiling repairs throughout Southeastern Michigan. Whether you're dealing with complex structural cracks or simply want the assurance of professional-grade results, our experienced team delivers fast, transparent service with superior craftsmanship.
Visit The Patch GuyzRelated Articles
Expert Drywall Repair And Installation In Southeast Michigan
If you're a homeowner in Southeast Michigan, you know that maintaining your property is essential, and drywall repair and installation in Southeast Mi…
Specialized Drywall Tear out and Replacement Services
Specialized drywall tear out and replacement is a crucial service for homeowners facing issues like water damage, mold, or aging materials. Did you kn…
Essential Guide to Drywall Tear out Services
A drywall tear out is often a necessary step in home renovation and repair, yet many homeowners are unaware of its importance until faced with signs o…