Essential Steps to Repair Drywall for Homeowners
Are you aware that nearly every homeowner will face drywall damage at some point? Whether
it's due to accidents, water leaks, or the everyday wear and tear of life, knowing the essential
steps to repair drywall for homeowners can save you both time and money. Tackling drywall
repairs may seem daunting, but with the right guidance and a bit of preparation, you can restore
your walls to their former glory and enhance the overall aesthetics of your home. In this
comprehensive guide, we’ll break down the process into manageable steps, providing you with
the necessary tools and techniques to successfully address any drywall issues you encounter.
Say goodbye to unsightly holes and stains, and hello to beautiful, smooth walls that reflect your
pride in homeownership!
Understanding Drywall Damage
Drywall is a crucial component of your home, providing structure and insulation. However, it’s
also susceptible to damage due to various factors like water leaks, accidental impacts, or
general wear and tear. Understanding these issues is the first step in addressing them
effectively.
Common Causes of Drywall Damage
- Water Damage: Often caused by leaky roofs, pipes, or high humidity levels.
- Impact Damage: Furniture, doors, or sports equipment can leave dents or holes.
- Regular Wear: Fading, cracking, or paint peeling over time due to age.
Signs It's Time for Repairs
Identifying signs of damage early can save you time and money. Look for:
- Visible holes or cracks
- Water stains indicating moisture issues
- Mold growth around edges
Tools and Materials Needed
Before diving into the steps to repair drywall for homeowners, gather the right tools and
materials to ensure a smooth repair process. Here’s what you’ll need:
Essential Tools for Drywall Repair
- Utility knife
- Taping knife
- Drywall saw
- Sanding sponge or block
- Drill and drywall screws
Recommended Materials for a Successful Job
- Drywall panels
- Joint compound (mud)
- Drywall tape (paper or mesh)
- Primer and paint to match existing walls
Preparing for the Repair Process
Preparation is vital for any successful drywall repair. It not only enhances safety but also
improves the quality of the final outcome.
Safety Precautions
- Wear gloves and a dust mask.
- Ensure the work area is well-ventilated.
- Clear the surrounding area of furniture and decor.
Gathering Your Tools and Materials
Ensure everything is at hand before beginning to avoid unnecessary interruptions. This will help
you focus on effectively completing your repairs.
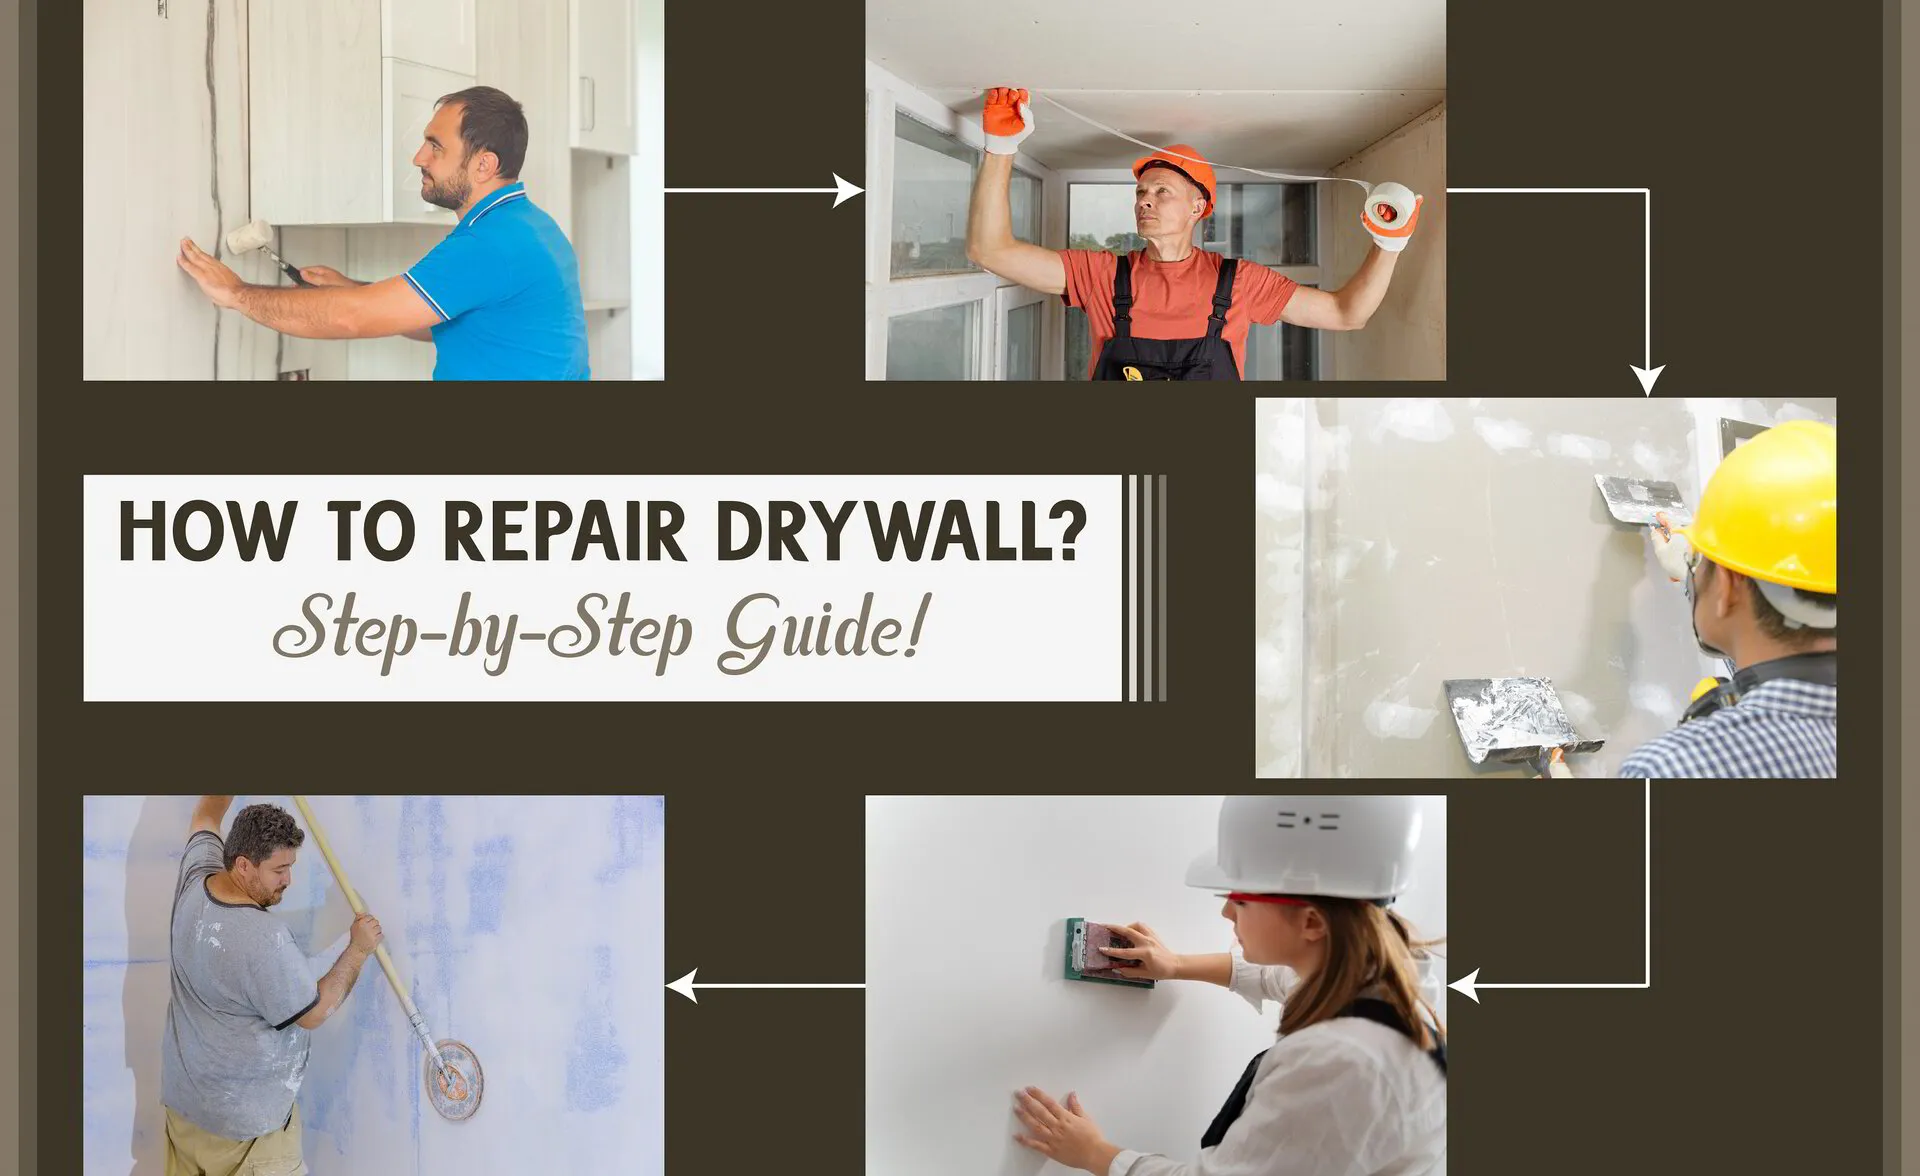
Step-by-Step Instructions to Repair Drywall
Now, let's walk through the essential steps to repair drywall for homeowners, making sure each
stage is manageable and clear.
Assess the Extent of the Damage
Examine the damaged area to determine if it requires patching or full replacement.
Preparing the Area for Repair
- Clear any furniture and cover the floor with a drop cloth.
- Use painters' tape to protect adjacent surfaces.
Cutting Out Damaged Drywall
- Carefully use a utility knife to trace around the damaged section, creating a square or
rectangle for easier patching.
Installing New Drywall Pieces
- Measure and cut new drywall to fit the opening.
- Use drywall screws to secure it in place.
Taping and Mudding the Joints
- Apply drywall tape over seams and corners.
- Use a taping knife to smooth joint compound over the tape and screw heads.
Sanding the Area Smooth
- Once dry, sand the area using a sanding sponge to create a smooth finish.
Finishing Touches
After repairing the drywall, it's time to complete the project with some finishing touches.
Priming and Painting
Apply a coat of primer to seal the repaired area and follow up with paint that matches the
existing wall color.
Touching Up for a Seamless Finish
Regularly step back and inspect your work to ensure smoothness and consistency with the
surrounding area.
For a more detailed guide, consider checking Home Depot’s Drywall Repair resources.
When to Hire a Professional
Sometimes DIY repairs may not be feasible. If the damage is extensive or you feel unsure about
handling it, consider hiring a professional. A licensed contractor can provide quality repairs,
ensuring your drywall looks pristine and lasts for many years.
Recap of the Key Steps to Repair Drywall for Homeowners
Remember, the key steps are assessing damage, proper preparation, and following a
systematic approach to repairs. Taking these steps can enhance your home's appearance and
integrity while saving you money in the long run.
Maintenance Tips for Future Prevention
After completing the necessary repairs, it’s important to establish a routine for maintaining your
drywall. Regular upkeep can prevent future issues, saving you time and money in the long run.
Routine Inspections
Conducting regular checks on your home's drywall can help you spot potential issues early.
Here are some key areas to focus on:
- High Humidity Areas: Check bathrooms and kitchens for signs of moisture.
- Around Windows and Doors: Look for cracks or gaps that could lead to water intrusion.
- Basements: Monitor for water stains or mold growth.
Addressing Small Issues Promptly
If you notice minor damage, address it immediately. Ignoring small problems can lead to more
extensive damage over time.
- Dents and Dings: These can often be easily filled with spackle.
- Cracks: Use joint compound to smooth over surface cracks before they expand.
Regular Cleaning
Keep your walls clean and free from dust and dirt, which can wear down the finish and promote
mold. Consider the following cleaning tips:
- Use a damp cloth to wipe down walls periodically.
- Avoid harsh chemicals that can damage the drywall surface.
Educate Family Members
Informing everyone in the household about proper care can also help protect your drywall.
Teach family members:
- To avoid banging furniture against walls.
- The importance of promptly reporting any leaks or water issues.
Consider Professional Inspections
For homeowners who are unsure about the state of their drywall, professional inspections can
provide peace of mind. Many home improvement companies offer service packages that
include:
- Comprehensive checks for structural integrity.
- Recommendations for any identified issues.
When deciding on your next steps, trust the keyword “steps to repair drywall for homeowners”
as your foundational guide to maintaining a safe and beautiful living space. For further
resources and professional advice, you can explore options from Lowe’s Home Improvement.
Taking preventative steps today can save homeowners significant repair costs down the line.
Prioritizing routine checks and addressing small issues ensures your drywall stays in optimal
condition for years to come.
When to Hire a Professional
While many drywall repairs can be tackled by homeowners, there are instances where hiring a
professional may be the best choice. Understanding when to seek expert help can save you
time and ensure high-quality results.
Identifying Complex Repairs
Some issues can exceed the abilities of even the most experienced DIYers. If you encounter
any of the following scenarios, consider bringing in a professional:
- Extensive Water Damage: If drywall shows signs of rot or mold, it may indicate
underlying issues that require specialized expertise.
- Structural Damage: Damage affecting the wall's integrity, such as sagging or large holes,
is better handled by professionals.
- High Ceilings or Large Areas: Repairing drywall in hard-to-reach areas can pose safety
risks. Professionals have the experience and tools necessary to work safely at height.
Benefits of Professional Services
Hiring a professional can offer several key benefits:
- Expertise and Experience: Professionals have extensive training and experience,
allowing them to identify and address issues effectively.
- Quality Assurance: They have access to high-quality materials and tools, ensuring a
more durable repair.
- Time-Saving: A professional can complete repairs in a fraction of the time it may take a
homeowner, allowing you to focus on other priorities.
Cost Considerations
While hiring a professional incurs costs, it’s essential to view it as an investment rather than an
expense. Evaluating the potential costs of incorrect repairs can help put things into perspective.
Consider:
- Long-Term Savings: Proper repairs lead to fewer long-term issues, potentially saving
you significant money.
- Avoiding DIY Mistakes: Mistakes in drywall repair can lead to additional costs, making
professional help cost-effective.
If you decide to hire a professional, it’s advisable to research local companies. Many reputable
home improvement providers offer drywall repair services. For assistance in finding qualified
professionals, check out websites like Angie's List, which connects homeowners with local
service experts.
In conclusion, understanding when to seek expert intervention is crucial in the overall steps to
repair drywall for homeowners. By recognizing the signs of complex repair needs and weighing
the benefits of professional services, you can ensure your home remains in top-notch condition.
Conclusion
Successfully completing the steps to repair drywall for homeowners is an essential skill that not
only enhances the visual appeal of your living space but also protects the structural integrity of
your home. By understanding the damage, gathering the necessary tools, and following a
systematic approach, you can effectively tackle repair projects on your own.
Recap of Key Steps
To summarize the critical steps involved in repairing drywall:
1. Assess the extent of the damage to determine if it requires simple patching or a full
replacement.
2. Gather essential tools and materials to ensure you are fully prepared before starting the
repair.
3. Follow a step-by-step process, including cutting, installing, taping, and mudding new
drywall sections.
4. Sand and finish the area to create smooth, visually appealing walls.
5. Maintain your drywall by routinely inspecting for potential issues and addressing them
promptly.
Encouragement to Take Action
Now that you are armed with knowledge about the steps to repair drywall for homeowners, it’s
time to take action. Don’t let minor damage linger, as it can lead to more significant issues down
the line. Whether you choose to tackle smaller repairs on your own or seek professional help for
larger issues, being proactive about maintaining your drywall will contribute to a safe and
beautiful home.
For more detailed resources or guidance, consider exploring professional home improvement
websites such as HomeAdvisor. With the right information and support, all homeowners can
confidently address drywall repairs and enhance their living spaces.
Essential Resources for Drywall Repair
Equipping yourself with the right knowledge and resources is fundamental to effectively
executing the steps to repair drywall for homeowners. Here are some valuable resources and
tools that can guide you through the repair process with confidence.
Online Guides and Tutorials
There are many reputable online platforms that provide comprehensive guides and video
tutorials. Some great resources include:
- YouTube: A plethora of instructional videos on drywall repair techniques, from basic
patches to more advanced installations.
- Home Improvement Websites: Websites like This Old House feature articles and
videos on drywall repair, offering step-by-step instructions and expert advice.
Drywall Repair Kits
Purchasing a drywall repair kit can simplify your project significantly. These kits often include
essential items such as:
- Pre-cut drywall patches
- Joint compound
- Taping tools
- Sanding sponges
By using a kit, you’ll ensure you have all necessary materials at your disposal, making the repair
process more seamless.
Professional Services
If the repairs feel overwhelming, or you encounter unexpected issues, consider hiring
professionals. Research local contractors who specialize in drywall repair, and make sure to:
- Read reviews and ratings from previous customers.
- Ask for quotes from multiple providers to find competitive pricing.
- Verify their licensing and insurance for peace of mind.
Home Improvement Retailers
Local home improvement stores are excellent sources for tools and materials. Major retailers
like Lowe’s and Home Depot offer a wide range of drywall products, including:
- Drywall panels
- Joint compounds
- Tapes and tools
Furthermore, staff members are often knowledgeable and can provide you with valuable advice
tailored to your specific repair needs.
By utilizing these resources and following the steps to repair drywall for homeowners, you can
ensure that your repairs are completed effectively and that your home remains in excellent
condition. Taking the time to educate yourself and prepare adequately will pay off in the quality
of your work.
Final Tips for Successful Drywall Repair
As you embark on the journey of following the steps to repair drywall for homeowners, keeping
a few final tips in mind can help you achieve the best results. Whether it's your first project or
you're a seasoned DIYer, these insights can enhance your repair process.
Preparation is Key
Taking the time to prepare the work area will significantly impact the outcome of your repair.
Consider the following tips:
- Clear the Area: Remove furniture and cover the floor to protect against dust and debris.
- Good Lighting: Ensure the work area is well-lit, allowing you to see details clearly during
the repair.
Work Methodically
Approach the repair process with a structured plan. Steps to follow include:
1. Take Your Time: Rushing can lead to mistakes. Proceed slowly through each step.
2. Check Your Work: After each stage—such as applying joint compound—check for
smoothness before moving to the next part.
Use Quality Materials
Investing in high-quality materials can greatly affect the durability of your repair. Consider:
- Opting for Higher-Grade Drywall: Thicker panels tend to be more durable and easier to
work with.
- Choosing Quality Joint Compound: A good joint compound reduces the risk of cracking
over time.
Safety First
Safety should always be a priority when working on home repairs. Remember to:
- Wear Protective Gear: Dust masks, safety goggles, and gloves can protect your health
during the repair.
- Use Proper Lifting Techniques: When handling heavy drywall sheets, lift with your legs
to prevent injury.
Know When to Consult an Expert
If you encounter unexpected challenges during your project or feel unsure about a particular
step:
- Seek Professional Help: It’s more efficient to consult with a professional rather than risk
an improper repair.
- Utilize Online Forums or Communities: Websites like Reddit have user communities
where you can ask for advice and share experiences.
By internalizing these final tips and rigorously following the necessary steps to repair drywall for homeowners, you’ll not only enhance your skills but also create a safer, more visually appealing
home environment. Taking pride in your repairs will ultimately lead to lasting improvement in
your living space.
Frequently Asked Questions About
Drywall Repair
When it comes to home improvement projects, understanding the steps to repair drywall for
homeowners can stir up a variety of questions. Here are some common queries and their
answers to help you navigate your drywall repair journey.
What Types of Damage Can Be Repaired?
Most common types of drywall damage that homeowners can repair include:
- Small Holes: Nail holes, small dents, or minor scratches can often be filled with spackle.
- Medium-Sized Holes: Larger holes may require a drywall patch or a piece of new
drywall.
- Water Damage: Stains and bubbling paint from water damage may also need complete
section replacement.
How Long Does a Typical Repair Take?
The time it takes to complete drywall repairs can vary significantly based on the severity of the
damage and your skill level. Generally, you can expect:
- Small Repairs: 1 to 2 hours, including drying time.
- Medium Repairs: 3 to 5 hours for the complete process, including mudding and sanding.
- Extensive Repairs: Up to a full day or more if you're replacing larger drywall sections.
What Tools Do I Really Need?
While performing repairs, having the right tools can make a significant difference. Essential tools
include:
- Utility knife for cutting drywall
- Taping knife for applying joint compound
- Drywall saw for larger cutouts
- Sanding block for smoothing the finished surface
- Drill for securing drywall screws
Can I Paint Over Repaired Areas Immediately?
It’s essential to let your repairs dry fully before painting. If you're unsure:
- Check for dryness: Ensure joint compound is completely dry to avoid trapping moisture
beneath the paint.
- Use Primer: Always apply primer over repaired areas to ensure a uniform finish and
better adhesion of the paint.
When Should I Consider Hiring a Professional?
If you come across challenges that feel beyond your skill set or the damage is extensive, it
might be best to hire a professional. Situations that might warrant professional help include:
- Complicated ceiling repairs
- Severe water damage affecting structural integrity
- Large wall sections needing replacement
For further information and resources guiding you through home improvement projects, check
out Home Depot’s DIY section for valuable resources.
By understanding these frequently asked questions about drywall repairs, you can bolster your
confidence as you embark on the steps to repair drywall for homeowners. With the right
preparation and knowledge, you can tackle you drywall projects with ease and ultimately
enhance your home’s aesthetics and functionality.
Key Benefits of DIY Drywall Repair
Understanding the steps to repair drywall for homeowners not only empowers you to tackle
household projects but also comes with several key benefits. Embracing DIY drywall repair can
lead to both immediate and long-term advantages.
Cost Savings
One of the most significant benefits of conducting your drywall repairs is the amount of money
you can save by avoiding professional service fees. Consider the following:
- Reduce Labor Costs: Hiring contractors can be expensive; taking on repairs yourself
eliminates these costs.
- Purchase Materials Only: You’ll only pay for materials required for the repair rather than
an inflated service fee.
Skill Development
Engaging in drywall repair projects allows you to build valuable skills that can be utilized in
future home improvement endeavors. Benefits include:
- Enhanced DIY Skills: Learning how to repair drywall opens the door to tackle various
household projects confidently.
- Problem-Solving Abilities: Whenever you encounter unforeseen issues, it hones your
ability to troubleshoot effectively.
Personal Satisfaction
Completing repairs yourself can lead to a sense of accomplishment and pride in your home.
This satisfaction stems from:
- Ownership: Seeing your work improves your living space can enhance your emotional
connection to your home.
- Increased Confidence: Successfully navigating repairs can build your confidence for
future projects.
Flexibility and Convenience
A DIY approach allows you to schedule repairs at your convenience, removing dependency on
contractor availability. Consider these aspects:
- Work at Your Own Pace: You can choose to spread the project over several days without
the pressure of external deadlines.
- Target Issues Early: Address minor damages immediately, preventing them from
escalating into larger problems.
Opportunity for Customization
By managing the repair process, you retain full control over the materials and styles used in
your project:
- Personal Preference: Choose colors and textures that fit your home’s aesthetic.
- Tailor Repairs: Adapt solutions specifically to your unique needs and style rather than
relying on a one-size-fits-all approach.
For further resources on improving your home and honing your DIY skills, you can explore
Lowe's DIY Project Guides.
Knowing the benefits of undertaking drywall repairs yourself empowers homeowners to begin
their journey in mastering the steps to repair drywall for homeowners. With the right resources
and mindset, you can transform your home into a well-maintained sanctuary that reflects your
personal touch.
What tools do I need for drywall repair?
To successfully complete drywall repairs, you'll need some essential tools including a utility knife
for cutting, a taping knife for applying joint compound, a drywall saw for larger cutouts, a
sanding block for smoothing surfaces, and a drill for securing screws. Having these tools on
hand will help ensure a smoother repair process.
How do I know if I can repair drywall myself or if I need to hire a
professional?
If the damage is minor, such as small holes or dents, you can likely handle the repair yourself
using the steps to repair drywall for homeowners. However, if you encounter extensive water
damage, large holes, or structural concerns, it’s advisable to hire a professional for a proper
assessment and repair.
Can I paint over my repaired drywall right away?
It's crucial to wait until the joint compound used in your repairs is completely dry before painting.
Generally, allowing it to dry for at least 24 hours is a good rule of thumb. After confirming it's dry,
applying a primer before painting will ensure better adhesion and a more even finish.
What should I do if I find mold on my drywall?
If you discover mold on your drywall, it’s essential to address it immediately. You should remove
any affected drywall and replace it. Additionally, ensure the source of moisture causing the mold
is fixed before repairing. Using mold-resistant drywall can help prevent future issues.
How long does it typically take to repair drywall?
The time required for drywall repair largely depends on the extent of the damage. Small repairs
can take around 1 to 2 hours, including drying time, while medium repairs could take 3 to 5
hours. Extensive repairs that involve replacing larger sections may take a full day or more.
The Patch Guys’ Step-by-Step Guide to Drywall Repair Every Homeowner
Can Master
Drywall damage happens to the best of us—whether it’s from moving furniture, doorknob dents,
or accidental bumps. At The Patch Guys, we believe every homeowner should feel confident
handling minor wall repairs without calling in a contractor for every crack or hole. That’s why
we’ve put together this easy-to-follow guide to help you tackle drywall damage like a pro. From
prepping the area to sanding and painting for a smooth finish, our proven steps will walk you
through the entire process with tips straight from our experienced team.

Related Articles

Expert Drywall Repair Specialists Near Detroit
Did you know that even the slightest crack in your drywall can lead to significant issues over time? For homeowners in the Detroit area, finding exper…
Expert Detroit Drywall Specialists you can trust
When it comes to home renovations and repairs, finding reliable Detroit drywall specialists can make all the difference in achieving a flawless finish…
Top Detroit Drywall Specialists you can trust
When it comes to home improvement, hiring reliable Detroit drywall specialists can make all the difference between a flawless finish and a frustrating…