Mastering the Best Drywall Patch Techniques: A Comprehensive Guide for Homeowners
Whether you're a homeowner dealing with everyday wear and tear, a landlord maintaining rental properties, or a small commercial property owner managing your space, understanding proper drywall repair is essential for maintaining your property's value and appearance. Drywall damage is inevitable – from accidental holes to cracks from settling, water damage, or repairs following HVAC, plumbing, or electrical work.
The good news is that with the right knowledge and techniques, many drywall repairs can be handled effectively, saving you time and money while ensuring professional-looking results. However, knowing when to tackle a project yourself versus calling in professionals like The Patch Guyz can make the difference between a seamless repair and a visible patch that detracts from your property's appearance.
This comprehensive guide will walk you through the best drywall patch techniques, from small nail holes to larger repairs requiring replacement sections. You'll learn about essential tools, materials, step-by-step processes, and common mistakes to avoid. Most importantly, you'll gain the confidence to assess when DIY approaches are appropriate and when professional expertise is your best investment for achieving flawless, long-lasting results.
Introduction to Drywall Patch Techniques
Understanding proper drywall patching techniques is crucial for maintaining the integrity and appearance of your walls and ceilings. Effective drywall repairs not only restore structural soundness but also preserve your property's aesthetic appeal and market value. When executed correctly, patches should blend seamlessly with existing surfaces, making repairs virtually invisible to the naked eye.
Drywall damage occurs for numerous reasons throughout a property's lifecycle. Common causes include accidental impacts from furniture, doorknobs, or daily activities that create holes and dents. Settlement cracks often appear as buildings age and shift naturally. Water damage from leaks, flooding, or humidity can cause sections to deteriorate, requiring immediate attention to prevent mold growth. Additionally, renovation projects involving HVAC installations, plumbing updates, or electrical work frequently necessitate cutting access holes that must be professionally patched afterward.
The benefits of mastering effective drywall repair techniques extend beyond simple aesthetics. Proper repairs maintain your property's structural integrity, preventing small issues from developing into larger, more expensive problems. Well-executed patches also prepare surfaces for painting, ensuring smooth, professional-looking finishes that enhance your space's overall appearance. For landlords and commercial property owners, quick, quality repairs minimize tenant disruption while maintaining property standards. Understanding these techniques helps you make informed decisions about which repairs to attempt yourself and when to engage professional services for optimal results.
Tools and Materials Needed
Success in drywall repair begins with having the right tools and materials readily available. Essential tools include various sizes of putty knives – typically 4-inch, 6-inch, and 10-inch widths for different application stages. A utility knife with sharp blades is crucial for cutting patches and trimming excess material. Sandpaper in multiple grits (120, 150, and 220) ensures smooth finishing, while a sanding block provides even pressure distribution.
Additional necessary tools include a drill with screwdriver bits for securing patches, a drywall saw for cutting larger holes cleanly, and a measuring tape for accurate patch sizing. A flashlight or work light helps identify imperfections during finishing stages. For texture matching, you may need brushes, rollers, or spray equipment depending on your wall's existing finish.
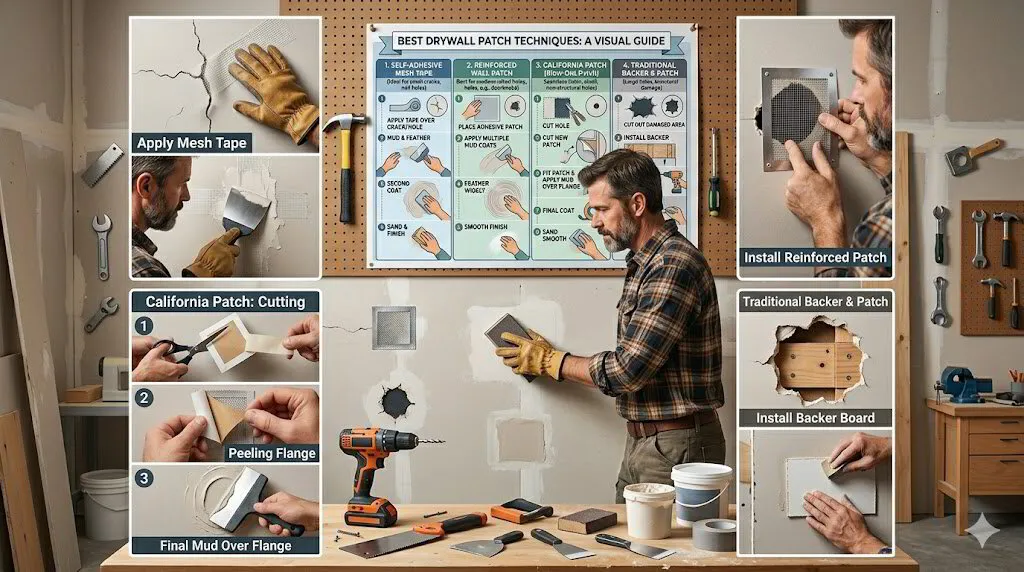
Material selection varies based on repair size and type. Joint compound (also called mud) comes in setting-type and ready-mixed varieties – setting compound dries faster but requires more skill, while ready-mixed offers longer working time for beginners. Mesh tape works well for small repairs and provides strong reinforcement, while paper tape creates smoother finishes for larger patches. Self-adhesive patches are convenient for small holes, but traditional methods often provide superior long-term results.
Safety considerations include wearing dust masks during sanding operations, safety glasses when cutting materials, and ensuring adequate ventilation when using compounds with strong odors. Quality primer and matching paint complete your material list, ensuring repairs blend perfectly with existing finishes. Having these materials organized and accessible before beginning work streamlines the repair process and improves final results.
Different Types of Drywall Patches
Understanding various drywall repair techniques allows you to select the most appropriate method for each specific damage type. Small hole repairs, typically involving nail holes, small screws, or minor dings, represent the most common DIY drywall repair situations. These repairs usually require only joint compound and careful application techniques. For holes smaller than a nail head, simply applying compound with a putty knife, allowing it to dry, and sanding smooth often suffices.
Slightly larger holes, up to about 1/2 inch diameter, benefit from mesh tape or self-adhesive patches. These provide backing support for the compound while preventing the patch from sinking into the hole. The mesh tape technique involves placing the tape over the hole and applying compound in thin layers, building up gradually to achieve a smooth surface that blends with surrounding areas.
Medium-sized patches address damage ranging from one to four inches in diameter, such as doorknob holes or small accidental impacts. These repairs typically require backing material – either a piece of drywall slightly larger than the hole or mesh backing. The California patch method involves cutting a square piece of drywall with paper backing extending beyond the patch dimensions, creating built-in tape for easier installation and finishing.
Large hole repairs necessitate more extensive drywall replacement techniques. Holes larger than four inches generally require cutting back to the nearest wall studs for proper support. This process involves measuring and cutting a replacement piece to fit precisely, securing it with drywall screws, and then taping and finishing the seams. These repairs often require multiple compound applications and careful sanding to achieve professional results.
Seam and crack repair methods address issues where drywall panels meet or where settling has caused separation. Paper tape typically provides the best results for these applications, as it creates stronger, smoother joints than mesh alternatives. Proper seam repair involves applying a base coat of compound, embedding the tape, and then applying additional coats to create seamless transitions. Understanding when to use each technique ensures optimal results for every repair situation you encounter.
Step-by-Step Drywall Patch Techniques
Proper surface preparation forms the foundation of successful drywall repairs and significantly impacts final results. Begin by thoroughly cleaning the damaged area, removing loose debris, dust, and any protruding paper or compound from previous repairs. For holes, use a utility knife to cut clean, straight edges – ragged edges prevent proper patch adhesion and create visible repair lines. Sand lightly around the repair area to create a smooth transition zone where new compound will blend with existing surfaces.
When cutting patches, measure carefully and cut slightly smaller than the hole dimensions to allow for easy fitting and compound application around edges. For larger repairs requiring backing, ensure the backing material extends at least one inch beyond the hole in all directions for adequate support. Test-fit patches before applying any compound to identify potential issues while adjustments are still easily made.
Applying patches requires patience and attention to detail for professional results. Start with thin compound layers, building gradually rather than attempting to fill everything in one application. For small holes, apply compound with a putty knife slightly wider than the repair area, using smooth, even strokes to minimize ridges and tool marks. Press firmly to ensure good adhesion while avoiding excessive pressure that could damage surrounding areas.
Medium and large patches require systematic approaches for optimal results. Apply base coats to secure patches and fill major gaps, then allow complete drying before proceeding. Second coats should extend beyond first applications, feathering edges to create smooth transitions. Third coats, when necessary, should extend even further, creating imperceptible blends with existing surfaces.
Sanding and finishing represent critical final steps that determine repair visibility. Use progressively finer grits, starting with 120-grit to remove major imperfections and finishing with 220-grit for smooth surfaces ready for painting. Sand lightly in circular motions, checking progress frequently with proper lighting to identify remaining imperfections. Avoid over-sanding, which can damage surrounding areas or create depressions requiring additional compound applications.
Painting and blending complete the repair process and require careful attention to achieve invisible results. Prime all repaired areas with high-quality primer to ensure uniform paint absorption and color matching. Use the same paint type and finish as existing surfaces, applying with similar techniques to match texture patterns. For textured walls, practice matching techniques on scrap materials before applying to actual repairs, ensuring consistent appearance across the entire surface.
Common Mistakes to Avoid When Patching Drywall
Surface preparation shortcuts represent one of the most frequent errors in DIY drywall repair, often resulting in patches that fail prematurely or remain visible after completion. Failing to clean repair areas thoroughly leaves debris that prevents proper compound adhesion. Skipping the step of cutting clean hole edges creates irregular surfaces that show through finished repairs. Many homeowners also neglect to sand around repair areas, missing opportunities to create smooth transition zones that help patches blend invisibly with existing surfaces.
Compound application errors frequently compromise repair quality and longevity. Applying compound too thickly in single applications leads to excessive shrinkage, cracking, and extended drying times that delay project completion. Conversely, applying insufficient compound fails to adequately fill voids and create smooth surfaces. Many DIY enthusiasts rush between coats without allowing proper drying time, causing layers to mix and creating weak bonds that may fail over time.
Inadequate sanding and finishing steps often make otherwise good repairs highly visible. Skipping progressive grit sequences leaves scratches and ridges that show through paint applications. Over-sanding creates depressions and damages surrounding areas, requiring additional repair work. Many homeowners also neglect proper lighting during sanding phases, missing imperfections that become obvious once painting begins and lighting conditions change.
Texture matching oversights frequently result in patches that stand out prominently despite otherwise quality work. Ignoring existing wall textures when planning repairs leads to smooth patches on textured surfaces or incorrect texture patterns that draw attention. Failing to practice texture techniques before applying to actual repairs often results in inconsistent patterns that highlight rather than conceal repair locations. Understanding and replicating existing finishes requires patience and skill that many DIY projects underestimate, making professional assistance valuable for achieving seamless results.
When to Call a Professional
Recognizing situations requiring professional expertise protects your investment and ensures lasting, high-quality results. Large-scale damage covering significant wall or ceiling areas typically exceeds DIY capabilities, requiring specialized tools, materials, and experience for proper restoration. Water damage repairs often involve structural concerns, mold remediation, and matching existing textures that demand professional assessment and treatment to prevent future problems.
Complex repairs involving electrical, plumbing, or HVAC integration require coordinated expertise to ensure proper installation and code compliance. Ceiling repair methods, particularly for textured or popcorn finishes, involve specialized techniques and potential asbestos concerns that necessitate professional handling. When repairs affect load-bearing walls or involve structural modifications, professional evaluation becomes essential for safety and building code compliance.
Time constraints often make professional services the practical choice for busy homeowners, landlords, and commercial property owners. The Patch Guyz specializes in efficient, high-quality repairs that minimize disruption while delivering seamless results. Our experience with southeastern Michigan properties ensures familiarity with local building styles, materials, and environmental considerations that affect repair longevity and performance.
Professional services provide valuable warranties and accountability that protect your investment long-term. When repairs involve valuable finishes, antique plaster, or historically significant properties, professional expertise ensures appropriate techniques and materials preserve character while addressing damage effectively. The Patch Guyz brings extensive experience with diverse property types throughout the Detroit metro area, understanding unique challenges faced by local property owners.
Quality assurance represents another compelling reason to engage professional services. Our systematic approach ensures proper surface preparation, material selection, application techniques, and finishing procedures that create invisible repairs. Professional tools and equipment enable techniques impossible with standard DIY supplies, while bulk material purchasing often makes professional services surprisingly cost-effective compared to purchasing small quantities of specialized materials for individual projects.
Choosing reputable contractors requires careful evaluation of credentials, experience, and local reputation. The Patch Guyz maintains comprehensive insurance coverage, proper licensing, and strong relationships with satisfied customers throughout southeastern Michigan. Our specialization in drywall and plaster repair ensures focused expertise rather than generalized construction knowledge, delivering superior results for your specific needs.
Conclusion and Next Steps
Mastering the best drywall patch techniques empowers property owners to address common repairs confidently while recognizing when professional expertise provides superior value. Understanding proper tool selection, surface preparation, application methods, and finishing techniques enables successful completion of many routine repairs. However, recognizing the limitations of DIY approaches and the complexity of achieving truly seamless results helps you make informed decisions about when to attempt repairs yourself versus engaging professional services.
The techniques outlined in this guide provide solid foundations for addressing various drywall damage types, from small nail holes to medium-sized patches requiring backing materials. Remember that patience, proper preparation, and attention to detail significantly impact final results, while rushing through steps often creates more problems than the original damage presented.
For property owners throughout southeastern Michigan's Detroit metro area, The Patch Guyz stands ready to handle repairs exceeding DIY capabilities or when your time constraints demand efficient professional solutions. Our specialized expertise in drywall repair, plaster restoration, ceiling repairs, and painting services ensures seamless results that maintain your property's value and appearance.
Ready to restore your walls and ceilings to perfect condition? Contact The Patch Guyz today for professional drywall repair services throughout southeastern Michigan. Visit https://thepatchguyz.net/ to learn more about our comprehensive repair services and schedule your consultation. Let our expertise handle your challenging repairs while you focus on what matters most to you.
Related Articles
The Ultimate Guide to Finding the Best Drywall Repair Services Near You
Finding the Best Drywall Repair Services Near You: A Comprehensive Guide When damage strikes your walls or ceilings, finding reliable repair services …
Expert Drywall Repair Services For Property Maintenance
Did you know that well-maintained drywall can dramatically influence the value of your property? Drywall repair services for property maintenance are …